If you’ve been around storyboards and segues for any time at all, you might’ve noticed the option to use a custom segue. I developed for a long time with the standard push and modal-style segues before my curiosity finally got the better of me. It turns out that it’s actually pretty easy to create a custom segue. Here’s how you do it.
But wait! Before we begin…
Custom segues are a chance for you to really explore the visual and kinetic experience of your app. They’re also something to be abused pretty easily. Before you deviate from something that’s built-in to the system and well-defined in the vocabulary of your users, you should ask yourself if what you’re doing really enhances the overall experience of your app. Here are the criteria that I use:
- Does this help the user navigate the app easier or understand where they are within the application more effectively?
- Does this get in the way of the user or delay any meaningful interaction?
- Does it cognitively help the user understand a relationship between two objects (e.g. a hierarchy)?
- Would I get annoyed with this if I were using it in someone else’s app?
That last one is pretty important because if you get annoyed with something, chances are your users will too.
If you answered all of these questions satisfactorily, then proceed. Otherwise, seriously consider what you’re doing. Remember the golden rule of development: “Do unto users as you would have another developer do unto you.”
Or something like that.
All right. With that out of the way, let’s segue over to the actual coding part of this tutorial and fire up Xcode.
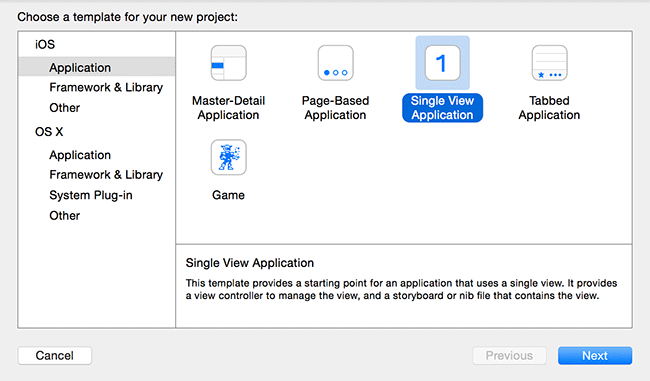
You’re probably going to want to start a new project. I chose a “Single View Application” because it’s a simple way to illustrate what’s going on. If you’ve got an existing project you’re adding this segue to, feel free to use that instead, but just know that my directions might not line up perfectly with what you need to do.
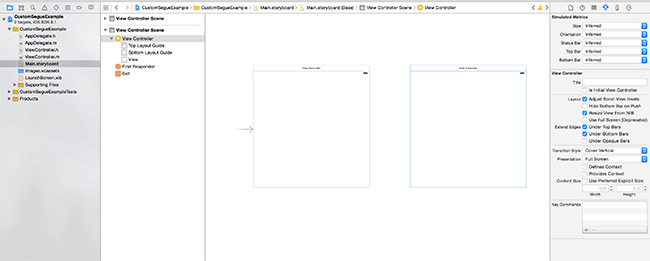
Once you’ve gotten your project created and ready, go to your storyboard. In our case, it’s Main.storyboard. Right now, you should see one lonely little view controller waiting to have some fun. Give him (or her) a friend by dropping in another view controller onto the stage from the Object library on the bottom right. Your view should probably look something more or less like what’s shown in the picture.
Go ahead and drag a button into your first view controller. We’re going to use this button to fire our segue later on. For now, it’s just a placeholder. If you look at the code example available for download at the bottom of this post, you’ll see that I also changed the background color on the views, added a pattern image in the code, and added a label on the second view controller to make the transition more apparent. It’s not necessary, but it does make our segue a little more obvious and visually interesting.
Our interface is mostly set up—let’s get to the fun stuff now.
Create a new class. Call it ExplodeSegue and have it inherit from UIStoryboardSegue.
// ExplodeSegue.h

#import <UIKit/UIKit.h>

@interface ExplodeSegue : UIStoryboardSegue

@end
All segues in iOS inherit from UIStoryboardSegue. On OS X, there is a corresponding AppKit class called NSStoryboardSegue. If you look at the class documentation (OS X here), you’ll see that there is basically one method called perform. All of the segue magic happens in that one method. Let’s create our own implementation of it in ExplodeSegue.m.
- (void)perform {
    UIViewController *currentViewController = self.sourceViewController;
    UIViewController *destinationViewController = self.destinationViewController;

    UIView *currentView = currentViewController.view;

    currentViewController.view = [[UIView alloc] initWithFrame:currentView.frame];

    [currentViewController.view addSubview:destinationViewController.view];
    [currentViewController.view addSubview:currentView];

    [UIView animateWithDuration:0.75 delay:0.0 options:UIViewAnimationOptionCurveEaseOut animations:^{
        currentView.transform = CGAffineTransformMakeScale(2.0, 2.0);
        currentView.alpha = 0.0;

    } completion:^(BOOL finished) {
        dispatch_async(dispatch_get_main_queue(), ^(void) {
            [currentViewController presentViewController:destinationViewController animated:NO completion:^{
                currentViewController.view = currentView;
                currentView.alpha = 1.0;
                currentView.transform = CGAffineTransformIdentity;
            }];
        });
    }];
}
What’s Going On
OK. I’m aware that’s a big messy chunk o’ code. Let’s talk about what’s going on here.
UIViewController *currentViewController = self.sourceViewController;
UIViewController *destinationViewController = self.destinationViewController;

// Grab a reference to the current view
UIView *currentView = currentViewController.view;
First, we’re grabbing a reference to the current view being displayed. We are doing this by accessing the sourceViewController property that is automatically assigned when we executed our segue. We do this so we can animate properties on that view separately from its parent. This is important because we’re going to remove this view from its hierarchy in the next step and add it onto a different parent view.
So, now that we have our reference to the existing view, let’s replace the source view controller’s view with an empty container where we will stack our view layers for transitioning.
// Create a blank container view and replace the view on View Controller #1 with it
currentViewController.view = [[UIView alloc] initWithFrame:currentView.frame];
Then, go ahead and stack our views. First, add the destination view to our empty container so it’ll be on the bottom. Then, add the current view we got our reference to a couple of lines earlier so it’ll cover up the destination view controller’s view.
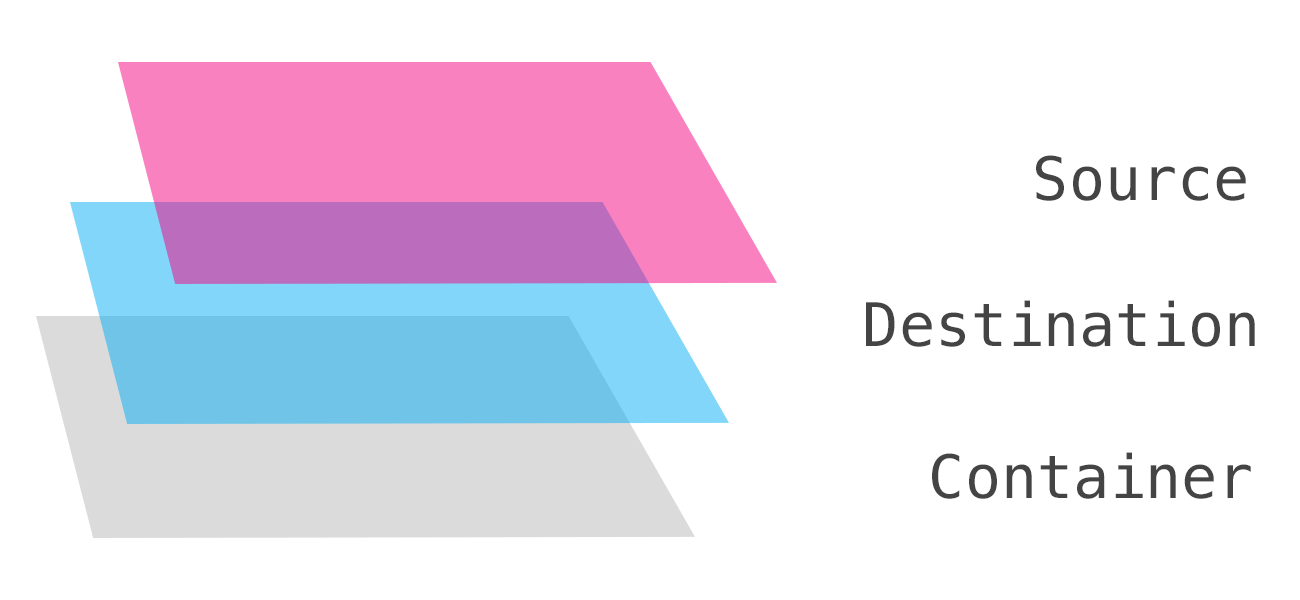
// Add the destination view and the place the current view on top of it so the destination view is hidden
[currentViewController.view addSubview:destinationViewController.view];
[currentViewController.view addSubview:currentView];
At this point, we’ve got our views staged and ready for animating. We can now animate the current view out of the way of the destination view. In our case, we are applying a scale transform and fading out at the same time. You can add other properties in here or animate in other ways if you’d like.
[UIView animateWithDuration:1.0 delay:0.0 options:UIViewAnimationOptionCurveEaseOut animations:^{

    currentView.transform = CGAffineTransformMakeScale(3.0, 3.0); // This scales the view
    currentView.alpha = 0.0; // Make it invisible

    // Animate other properites here if you wish or change the ones above. Whatever you want!!!

} completion:^(BOOL finished) { ... }];
The completion block we have attached to this animation is where the real “transition between views” actually happens. The presentViewController:animated:completion: method call presents the destination view controller and makes it the current property. We have to call this asynchronously if we don’t want to get unbalanced calls for the begin and end transitions because the begin transition could occur before the end transition is complete. This puts the app in a weird state and could cause view transition problems.
Plus, you get a nasty message in the console and no one likes getting yelled at by Xcode.
dispatch_async(dispatch_get_main_queue(), ^(void) {
    [currentViewController presentViewController:destinationViewController animated:NO completion:^{ ... }];
});
At the end, we do a little bit of clean-up to reset the view hierarchy on the destination view. This is helpful if you plan on unwinding back to the original view at some point.
currentViewController.view = currentView;
currentView.alpha = 1.0;
currentView.transform = CGAffineTransformIdentity;
Wire It Up
All right. We’ve got our segue created. Let’s wire up the placeholder button we created earlier to execute the segue whenever it’s tapped. If you’re using the visual editor in Xcode, this is as simple as Ctrl-dragging from the button to the other view controller’s icon in the Document Outline on the left.
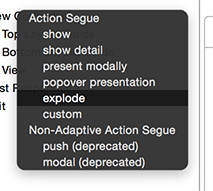
Whenever you finish dragging, you’ll notice that a modal pop-up comes up so you can select the type of segue you want. If you look at this list, you’ll notice that our ExplodeSegue segue shows up in the list automatically as explode! Good job, Xcode! Go ahead and select that option and it’ll create a segue for you as indicated by the arrow now placed on the stage.
If you click that lage arrow on the canvas and check out its properties in the attributes inspector on the right, you’ll see that the type of segue is “Custom” and the segue class is our class we created earlier, ExplodeSegue.
Note: You can also trigger the segue programmatically, if you’d like. You’ll need to know the class of the destination view controller. The code snippet below uses a storyboard ID to instantiate one. You’ll create your custom segue and manually pass the source and destination in the initializer. Place code this in a button action or some other method that’s executed to get it triggered. Here’s an example:
UIViewController *destinationViewController = [self.storyboard instantiateViewControllerWithIdentifier:@"MyViewControllerId"];
ExplodeSegue *segue = [[ExplodeSegue alloc] initWithIdentifier:@"" source:self destination:destinationViewController];
[self prepareForSegue:segue sender:sender];
[segue perform];
Run It
Build and Run (⌘R) the project and you should see a custom zooming out segue whenever you transition from one screen to the next.
While hopefully this seems to work well, there is a caveat with this example, unfortunately. Whenever you move a view out from its parent, all that view’s constraints are broken. If you think about it, it makes sense because constraints are basically contracts between two specific views. However, that doesn’t make things any easier for you.
To get around this, the fix could be as simple as nesting your view inside a container view, making your constraints against that container and then moving the container view across in the segue. I’ll leave that as an exercise to the reader. Your mileage may vary.
With that caveat in mind, you now have all the knowledge it takes to get started with custom segues. Comments? Questions? Segue on over to Twitter and send them my way (@beardforhire).