We have Optionals in Swift to express nullability within code. They are amazingly simple, yet subtly complex. I wrote about them in my last post. But, what if the majority of your codebase is in Objective-C? Or, what if you’re maintaining a codebase written entirely in Objective-C, but you want it to be a little more compatible and easier-to-use for Swift developers?
It’s possible to just jump in and combine Objective-C and Swift code in an application. Xcode makes this very easy to do. However, you might notice that you’ll start a lot of implicitly unwrapped optionals if you do this. In other words, you’ll start seeing a lot of !s in your Swift code.
Not pretty.
Now, this isn’t fundamentally bad or wrong. In fact, this is the complexity of nullable objects that Swift is forcing you to deal with and Objective-C doesn’t really concern itself with. Thankfully, Apple has provided a set of type annotations that you can use to make your Objective-C code interoperate a little cleaner with Swift.
_Nullable and _Nonnull
The two new type annotations are _Nullable and _Nonnull if you’re on Xcode 7+. Now, they’re called type annotations because, if you’ll recall, String and String? are different types in Swift. You prepend/append these annotations to mark the different types in your Objective-C code. To start using them, let’s say you have a class called ExampleClass that looks like this:
@interface ExampleClass : NSObject

@property (nonatomic, copy) NSString *exampleString;
@property (nonatomic, copy) NSString *anotherString;
- (NSString *)someMethod:(NSString *)someString;

@end
You can use the new annotations like this:
@interface ExampleClass : NSObject

@property (nonatomic, copy) NSString * _Nonnull exampleString;
@property (nonatomic, copy) NSString * _Nullable anotherString;
- (NSString * _Nonnull)someMethod:(NSString * _Nullable)someString;

@end
If you’re using pointer-type objects like we are above, you can actually use a slightly different set of annotations to make things cleaner: nullable and nonnull. They are basically the same thing, but they are a little nicer to look at (especially the property variant) and flow into Objective-C code cleaner. Here the same example written using the shorthand annotations:
@interface ExampleClass : NSObject

@property (nonatomic, copy, nonnull) NSString *exampleString;
@property (nonatomic, copy, nullable) NSString *anotherString;
- (nonnull NSString *)someMethod:(nullable NSString *)someString;

@end
This looks closer to non-annotated Objective-C code and reads a little better because it’s less verbose, in my opinion. However, as soon as you use a non-pointer object, like say an NSInteger or a CGRect, these won’t work anymore. You’ll need to fall back to the _Nullable/_Nonnull versions.
Xcode Loves Warnings
As soon as you start migrating your classes, Xcode does do one annoying thing: it expects you to follow through by putting annotations on every object in the class. If you don’t, then expect a ton of warnings.
There are a couple of shorthand macros for this though. They’re called “audited regions.” The class we’ve been using as an example can be wrapped with NS_ASSUME_NONNULL_BEGIN and NS_ASSUME_NONNULL_END to create these audited regions. This makes everything between these macros assumed to be non-null. Then, we can override for nullability circumstances when it’s expected. Like so:
NS_ASSUME_NONNULL_BEGIN
@interface ExampleClass : NSObject

@property (nonatomic, copy) NSString *exampleString;
@property (nonatomic, copy, nullable) NSString *anotherString;
- (NSString *)someMethod:(nullable NSString *)someString;

@end
NS_ASSUME_NONNULL_END
We know anotherString could be nil and that the someString argument passed into someMethod could also be nil. So, we’ve reduced the amount of work required to add proper types for Swift code and made Xcode a little less naggy. Brilliant!
Preview Swift Code Without Writing Swift
Xcode makes it really easy to see what your Objective-C code will translate into when using Swift. When you’re viewing the header file for your class, click on the four squares icon in the top-left corner of the text editor. Navigate the menu to Counterparts -> .h (Interface). You’ll see the Swift interface for the class.
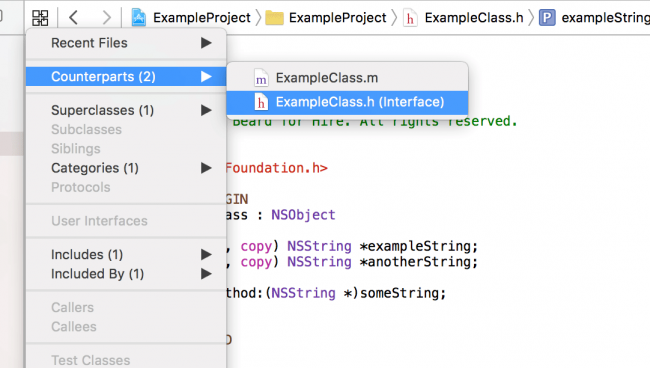
Using this method to view our interface shows us our original code has gone from this:
public class ExampleClass : NSObject {

    public var exampleString: String!
    public var anotherString: String!
    public func someMethod(someString: String!) -> String!
}
to this:
public class ExampleClass : NSObject {

    public var exampleString: String
    public var anotherString: String?
    public func someMethod(someString: String?) -> String
}
I think that’s a great improvement. WAY less !s, for sure. Swift developers will be happy with that. And, it’s certainly more Swift-y and will be a lot easier to combine languages within the application.
Note: I actually didn’t know about this little trick until I read about it from Keith Harrison here: http://useyourloaf.com/blog/using-nullable-to-annotate-objective-c.html. Oddly enough, he decided to post about this around the same time as me. I suspect we both have the same New Year’s resolution of writing more interoperable Objective-C code, but I can’t confirm.
Gotchas and Special Circumstances
There are a few “gotchas” when working with the _Nullable annotations—specifically things to remember for NSError** and id * objects. I’d recommend going through Apple’s Nullability and Objective-C Guide on the Swift Swift Blog.
This is a great way to start to transition your codebase from Objective-C to Swift. It won’t affect your existing code and will make it much easier to develop new code that in Swift that interacts with your older Objective-C code.