Comments

We have Optionals in Swift to express nullability within code. They are amazingly simple, yet subtly complex. I wrote about them in my last post. But, what if the majority of your codebase is in Objective-C? Or, what if you’re maintaining a codebase written entirely in Objective-C, but you want it to be a little more compatible and easier-to-use for Swift developers?

It’s possible to just jump in and combine Objective-C and Swift code in an application. Xcode makes this very easy to do. However, you might notice that you’ll start a lot of implicitly unwrapped optionals if you do this. In other words, you’ll start seeing a lot of !s in your Swift code.

Not pretty.

Now, this isn’t fundamentally bad or wrong. In fact, this is the complexity of nullable objects that Swift is forcing you to deal with and Objective-C doesn’t really concern itself with. Thankfully, Apple has provided a set of type annotations that you can use to make your Objective-C code interoperate a little cleaner with Swift.

_Nullable and _Nonnull

The two new type annotations are _Nullable and _Nonnull if you’re on Xcode 7+. Now, they’re called type annotations because, if you’ll recall, String and String? are different types in Swift. You prepend/append these annotations to mark the different types in your Objective-C code. To start using them, let’s say you have a class called ExampleClass that looks like this:


@interface ExampleClass : NSObject

@property (nonatomic, copy) NSString *exampleString;
@property (nonatomic, copy) NSString *anotherString;
- (NSString *)someMethod:(NSString *)someString;

@end

You can use the new annotations like this:


@interface ExampleClass : NSObject

@property (nonatomic, copy) NSString * _Nonnull exampleString;
@property (nonatomic, copy) NSString * _Nullable anotherString;
- (NSString * _Nonnull)someMethod:(NSString * _Nullable)someString;

@end

If you’re using pointer-type objects like we are above, you can actually use a slightly different set of annotations to make things cleaner: nullable and nonnull. They are basically the same thing, but they are a little nicer to look at (especially the property variant) and flow into Objective-C code cleaner. Here the same example written using the shorthand annotations:


@interface ExampleClass : NSObject

@property (nonatomic, copy, nonnull) NSString *exampleString;
@property (nonatomic, copy, nullable) NSString *anotherString;
- (nonnull NSString *)someMethod:(nullable NSString *)someString;

@end

This looks closer to non-annotated Objective-C code and reads a little better because it’s less verbose, in my opinion. However, as soon as you use a non-pointer object, like say an NSInteger or a CGRect, these won’t work anymore. You’ll need to fall back to the _Nullable/_Nonnull versions.

Xcode Loves Warnings

As soon as you start migrating your classes, Xcode does do one annoying thing: it expects you to follow through by putting annotations on every object in the class. If you don’t, then expect a ton of warnings.

There are a couple of shorthand macros for this though. They’re called “audited regions.” The class we’ve been using as an example can be wrapped with NS_ASSUME_NONNULL_BEGIN and NS_ASSUME_NONNULL_END to create these audited regions. This makes everything between these macros assumed to be non-null. Then, we can override for nullability circumstances when it’s expected. Like so:


NS_ASSUME_NONNULL_BEGIN
@interface ExampleClass : NSObject

@property (nonatomic, copy) NSString *exampleString;
@property (nonatomic, copy, nullable) NSString *anotherString;
- (NSString *)someMethod:(nullable NSString *)someString;

@end
NS_ASSUME_NONNULL_END

We know anotherString could be nil and that the someString argument passed into someMethod could also be nil. So, we’ve reduced the amount of work required to add proper types for Swift code and made Xcode a little less naggy. Brilliant!

Preview Swift Code Without Writing Swift

Xcode makes it really easy to see what your Objective-C code will translate into when using Swift. When you’re viewing the header file for your class, click on the four squares icon in the top-left corner of the text editor. Navigate the menu to Counterparts -> .h (Interface). You’ll see the Swift interface for the class.
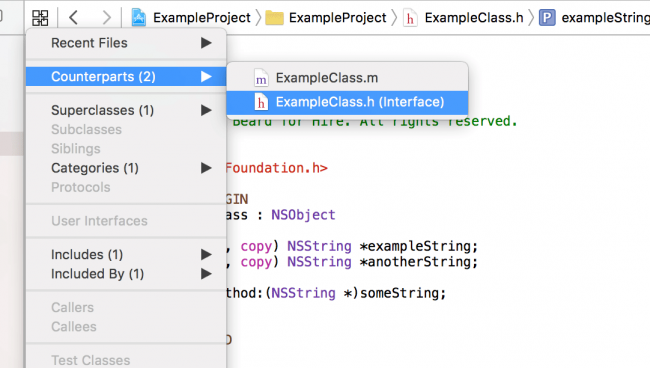
How to view Swift interfaces generated from Objective-C code

Using this method to view our interface shows us our original code has gone from this:


public class ExampleClass : NSObject {
    
    public var exampleString: String!
    public var anotherString: String!
    public func someMethod(someString: String!) -> String!
}

to this:


public class ExampleClass : NSObject {
    
    public var exampleString: String
    public var anotherString: String?
    public func someMethod(someString: String?) -> String
}

I think that’s a great improvement. WAY less !s, for sure. Swift developers will be happy with that. And, it’s certainly more Swift-y and will be a lot easier to combine languages within the application.

Note: I actually didn’t know about this little trick until I read about it from Keith Harrison here: http://useyourloaf.com/blog/using-nullable-to-annotate-objective-c.html. Oddly enough, he decided to post about this around the same time as me. I suspect we both have the same New Year’s resolution of writing more interoperable Objective-C code, but I can’t confirm.

Gotchas and Special Circumstances

There are a few “gotchas” when working with the _Nullable annotations—specifically things to remember for NSError** and id * objects. I’d recommend going through Apple’s Nullability and Objective-C Guide on the Swift Swift Blog.

This is a great way to start to transition your codebase from Objective-C to Swift. It won’t affect your existing code and will make it much easier to develop new code that in Swift that interacts with your older Objective-C code.

Comments

Let me start by saying if you’re new to Swift and having trouble understanding Optionals, this is a good read. If you’ve been around the Swift block a few times, this will probably be a repeat to you, but still, hopefully, useful. Also, if you’re an Obj-C developer who just can’t let go of your []s and @s, know that I’m simplifying what nil is in Objective-C when I mention it.

All right, you’ve been warned. Let’s dive in.


One of the easiest, and at the same time hardest, things for me to grasp when I was learning Swift was Optionals. I understand the basic idea of having variables that can never be nil and having ones that can. For example, this is simple for me to understand:


let neverNil: String = "This string can never be nil";
var maybeNil: String? = "This string might be nil at some point."

Obviously neverNil can (spoiler) never be nil and maybeNil can be nil… maybe. If you set it to nil. One of the reasons neverNil can’t be nil is because it’s an initialized constant and you can’t change constants once they’re intialized.

However, even the following doesn’t work:


var neverNil: String = "This string can STILL never be nil";
neverNil = nil // compiler error

Trying to set that thing to nil will give you a nice, fat compiler error. I think the basic concept up until here really is easy to understand.

Now, here is where I used to get confused. These are are both string values, right? So why doesn’t this work:


var neverNil: String = "It won't be nil"
var maybeNil: String? "It might be nil"

neverNil.uppercaseString // IT WON'T BE NIL
maybeNil.uppercaseString // compiler error

You can call uppercaseString on one of the strings, but not the other.

That’s because one is of type String and the other is of type String?. The ? in Optionals doesn’t just denote that it can be empty, it is literally a different type. That’s the beauty and simplicity of the system that I missed before. It’s so important, that I want to repeat it:

String and String? are different types.

One is a String and the other is a String value wrapped in a box that you have to open up before you can use. There are three common ways to open that box and get that value: Optional Binding, Optional Chaining and Forced Unwrapping.

Optional Binding

Hang around a Swift codebase long enough and you’ll see this pretty quickly:


var maybeNil: String? = "It might be nil"

if let definitelyNotNil = maybeNil {
    neverNil.uppercaseString // IT MIGHT BE NIL
}

What’s important here is that because String and String? are not the same type, the compiler is forcing you to DEAL with the fact that you could have a nil value at some point. You are BINDING the optional value to the definitelyNotNil constant. Essentially, the Optional gift box is opened and its contents are handed off to definitelyNotNil, which is used in the if statement’s block. If the Optional has nothing inside of it (i.e. it’s nil) then the if control structure returns false (basically) and the code that requires it to be a String is bypassed.

This is Swift’s way of dealing with the problem that your object might be nil versus just ignoring it and assuming it’ll be fine.

One more thing to note: this example is fairly contrived and isolated. Swift 2.0 introduced a new, slightly different way of doing this. Here’s how you might use this using the guard keyword inside of a method:


func someMethod() {
    guard let definitelyNotNil = maybeNil else {
        return;
    }
    
    definitelyNotNil = "This definitely contains a value now"
}

It’s not that functionally different from before, but it has the advantage of putting all your method’s logic in the body instead of buried in an if statement block in addition to exiting early (which is usually a good thing). FWIW, this style is becoming more preferable compared to the “older” way (Swift is only 1½ years old, you know).

Optional Chaining

Now, that’s a lot more code than we need for our example. Instead, we can unwrap our Optional to get the value inline beside to the method call like this:


var maybeNil: String? = "It might be nil"
maybeNil?.uppercaseString // IT MIGHT BE NIL

This is where the fact that String and String? are completely different types matters. You can’t call maybeNil.uppercaseString because an Optional object doesn’t have a method called uppercaseString. The ? in the statement unwraps the value from the optional (so it’s then a String) and uses that instead.

What makes this more useful though is that if there isn’t a value (i.e. maybeNil is nil), then the execution chain just stops and uppercaseString is never called on a nil object.

Once again, Swift has forced you to deal with the problem instead of just ignoring it. It’s just more succinct this time.

Forced Unwrapping

This is the simplest unwrapping method of all:


var maybeNil: String? = "It might be nil"
maybeNil!.uppercaseString // IT MIGHT BE NIL

That ! at the end of maybeNil is telling the compiler, “Don’t worry. I’ve got this. It’s not nil.” It’s basically the Swift equivalent of sudo. Do what I say because I know what I’m talking about.

This simplifies the logic if you know it will never be nil. Our example above is a great one because we know the value isn’t nil because we’re setting it on the line right above—we’re handling all the mutation (changes to the variable) ourselves.

However, what about this example?


var maybeNil: String? = "It might be nil"
someMethod(maybeNil)
maybeNil!.uppercaseString // prints "IT MIGHT BE NIL" (hopefully)

There’s a problem here.

This compiles because we’re explicitly telling the compiler that we are sure maybeNil isn’t nil. But, we actually have no way of knowing for sure what exactly someMethod does. It could even assign nil to that variable at some point in its execution—but we’re telling the compiler this isn’t nil! That’s why forced unwrapping with ! should be used sparingly. It’s handy for code brevity and when you’re absolutely sure a value is there. But, when you’re not, you’re going to get a runtime error.

And nobody likes runtime errors.

Conclusion

This post was much longer than I started out to write about Optionals. I think that’s because they are a supremely simple concept with a ton of intricacies. It’s easy to think Swift code is more complex because of Optionals compared to Objective-C. However, the code isn’t more complex; that complexity was still there in Objective-C, it just wasn’t dealt with properly (or oftentimes at all). Swift puts it forward so you have to deal with it. The result is a much safer language, which translates directly to less crashes.

Tune in next time, when I talk about how Objective-C developers can get nil safety with the new _Nullable syntax.

Comments

Maybe I’m just crazy, but it feels like Auto Layout kind of hates me. If you don’t feel that way, try doing making a UIView that is 50% height and 100% width of the container.

In a Storyboard, it’s actually not too hard—a little roundabout, but not bad once you know about multipliers. Create the UIView, Ctrl-drag from the UIView to the container view and select “Equal Height.” You can then edit properties of the constraint and set the Multiplier to 1:2 (this is what makes it 50% height). Add your Top, Left and Right constraints to make it 100% width and you’re good.

I had a XIB though.

There didn’t seem to be any way to create an “Equal Height” relationship with the root view object and the UIView I had placed. I ended up having to create a separate UIView that I made 100% width and height of its container (Top, Left, Right and Bottom constraints set to 0) to use as a placeholder for my Equal Height relationship with my UIView. Once I connected those two, I followed the same process of changing the multiplier to 1:2 and adding the Top, Left and Right constraints; the sizing worked like a charm at that point.

The fact that I had to “trick” Auto Layout is a little unnerving.

Now, there has been tremendous progress with Auto Layout in the last couple of years. And it’s way better than the old springs and struts method. The fact that I was doing all this in a view intended for both and iPhone and iPad was awesome. However, it still never really feels like it “just works.” Maybe I’m just asking too much though?

Comments

There is a problem with the Apple Watch. To be clear, it’s not a problem I have with the watch (unlike others) it’s a problem Apple has with it.

To understand what I mean, let’s start with the iPhone.

The iPhone is, arguably, the best smartphone you can buy. This is an opinion that millions and millions of people share and have expressed with lots and lots of money over the last few years. The smartphone as a broad category, after the iPhone debuted at least, is something that has altered our lives and deeply changed how we communicate with each other. You can question this conclusion, you can disagree with it, but the results speak for themselves.

Now, what about the Apple Watch?

There are wearables out there now. They’re not changing the world in the same way though. The possibility exists, but it’s not happening—the fish just aren’t biting. It’s very much 2006. The current crop of devices isn’t anything remarkable, to be sure; they’re not the sort of devices that will be remembered in three years—or maybe even one. The Apple Watch will.

In a recent article from TechCrunch, Matthew Panzarino stated that the selling point of this new device is about saving time. Actually, no. I say it’s about giving back time. Subtle difference, maybe, but important nonetheless. I said a few paragraphs ago that smartphones (i.e. the iPhone) have changed society. That’s true. When is the last time you spent time with someone in the real world when at least part of that time wasn’t interrupted by a device or the familiar “ding” of a text message? If you’re anything like me, it’s probably been a while.

Digital detox is a thing now. A few years ago, it wasn’t. People are getting inundated with notifications and requests and buzzing and messages and increasingly intrusive forms of interruption. But, people keep buying the iPhones. Why? If they’re so terrible, as everyone seems to keep saying, why would we keep buying them?

Maybe because they’re the best we have right now. Maybe it’s because everything else is even more annoying and more intrusive. Remember when you had to wait around all day for a call? “Sorry, honey, I can’t go with you to the park with the kids. I’m expecting a phone call for work.” THIS USED TO BE A THING! Is that guy on the phone at his kid’s baseball game annoying? Yes. Is it distracting? Yes. Will I ever be that guy? I pray no. But, is he at least present at his kid’s game? Yes. Pre-cell phone, would he have been? Probably not.

Life doesn’t stop. As the always imitable Ferris Bueller once said, “If you don’t stop and look around once in a while, you could miss it.” This is the Apple Watch. If you can reduce the interaction time required of you, like the Apple Watch seems like it’s going to, then you’re in a remarkable position. People want that. It’s that wonderful position Apple “found” itself in (through careful planning and exceptional execution) in 2001, 2007 and 2010.

Except, the problem I was talking about.

It boils down to this: how do you talk about the Apple Watch’s biggest selling point, giving you back time from your devices, without alienating the very people who are buying those devices and loving them right now?

The pitch seems to boil down to “give us a few hundred dollars for a smartphone, because you need one and it’ll change your life. But, you also need to give us a few hundred dollars more so that you don’t have to mess around with that phone you just bought that we said would change your life.” This seems confusing to people on the outside and I think it’s coming across that way in Apple’s messaging. It’s also a different message than before. The iPhone was replacing your feature phone. The MacBook was replacing your desktop. The iPad was replacing your MacBook.

The Apple Watch isn’t replacing your iPhone. It’s adding more stuff on to it.

Apple talks about how many things the Apple Watch can do, they also talk about the promise the device holds after developers get their pizza-stained, Mountain Dew-drinking hands on it, but very little is spent talking about how this thing will save you give you back time from your iPhone.

The iPhone you just bought. The one you’re more than likely reading this on now.

I’m not saying it’s an impossible message to express. In fact, Apple might be the best company to express it because they’ve done similar things before. Look no further than the iPhone replacing iPod unit sales and the iPad striving to replace MacBook unit sales. I’m not saying Apple can’t do it. All I’m trying to say is that I don’t think Apple is doing a good job of expressing it right now. They seem to be shying away from this message and I think that is a mistake.

No one is going to buy it if they don’t really understand how much better it is than what they’ve already got. People understand why you buy a smartphone over a feature phone. They understand why you buy a tablet over lugging around a laptop. But, most people don’t understand why you would buy an Apple Watch (or a wearable in general).

That, to me, is the Apple Watch’s biggest problem.

Comments

Craig Hockenberry has suggested a new app state other than “Ready for Sale.” If you have a minor violation of the App Store Review Guidelines, your app goes into a “Must Fix” state, but it’s still available in the App Store.

I like this idea.

I think it is a little open-ended in its current state, however. How soon should a developer fix the problem? What’s the timeframe?

My suggestion is that as an added “push” to devs, there could be an expiration date of two or three weeks at which point the app will be removed from sale if a new binary hasn’t been submitted. That gives developers time to fix problems and re-submit; it also keeps them accountable for doing it in a timely manner. As an added bonus, it gives everyone a clearly defined timeline and removes some ambiguity from the previously suggested process.

Now, would Apple do something like this? Probably not. That would mean at any given time, the App Store would contain apps that technically “failed” their review. To me, it doesn’t seem like that would be acceptable to Apple. But who knows? Maybe some day?